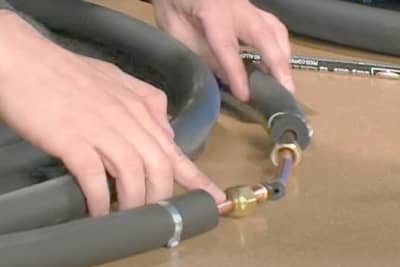
If you are comfortable performing mechanical home projects, and have a basic set of tools, you will likely find installing your own air conditioner a straightforward job that will take about 6 to 9 hours, depending on your home.
The work consists of two primary parts: what you can do on your own, which is about 90% of the project, and what your local heating and air conditioning contractor should do for you to complete the job. Due to laws pertaining to the handling of refrigerant as well as special tools required, the completion of the project is to be done by an air conditioning professional.

Assistance from a contractor will cost you about $100 to $300 depending on the extent of the work that remains and local labor costs. We will help you find a contractor in your area to perform this work by personally contacting ten of them on your behalf after you make your equipment purchase. Read more about our Contractor Assistance program. If you are replacing an existing air conditioning unit, you will also need an air conditioning professional to evacuate the Freon from the old unit before you can remove and dispose of it. It will take a contractor approximately 1 hour to do this, plus perhaps a small refrigerant disposal fee (less than $20). Again, shop around for the best price from several contractors before selecting one for the job. Total Freon evacuation cost by a professional including disposal fees should be between $75 and $100.
Step by Step AC Installation Guide

The bulk of the work can be done by you, which translates into significant savings. This also typically ensures the job will be done as carefully (if not more so) than if it were done by a professional, since homeowners tend to take special care of their own home projects. See our online Step-by-Step Air Conditioning Installation Guide, or look at our one-hour AC Installation DVD. We include the AC Installation DVD with the purchase of an air conditioning kit or condensing unit. Printed installation guidelines from the manufacturer are also included with the air conditioner.
What You Need:
Equipment:
- Condensing Unit
- Pad (base)
- (2) Electrical Whips
- Electrical Safety Shut Off – “Disconnect”
- Evaporator Coil
- Line Set (flexible copper tubing)
Tools:
- L-Square
- Sheet Metal Shears
- Sheet Metal Benders (optional)
- Wire Cutters
- Wrench
- Screwdriver
- Hex Nut Drivers
- Tubing Cutter
- Hole Saws (about 2 inches)
- Tape Measure
- Drill Bits
- 1/4″ Drill Chuck for Sheet Metal Screws
- Wire Nuts
- Drill
- Hammer
Supplies (Included in AHA Supplies Package):
- Pre-Fabricated Sheet Metal
- 1/2″ Drain Tubing
- Low-Voltage 5 Conductor Wire
- Plastic Tie Wraps
- Sheet Metal Screws
- Low Voltage Wire Nuts
- Evaporator Coil Drain Fitting
- Copper Fittings
- Spade Connectors
- Plastic Hangers (for hanging line set)
Supplies (Not Included In AHA Supplies Package)
- High Voltage Flexible Wire (unique to your condensing unit)*
- Wire Nuts (3 needed for high voltage wiring)
- 4×4 Electrical Junction Box
- Connector Box
- Nails
- Wire Staples
- Thumb Gum or Caulking
Items to be completed by a contractor to finish the air conditioning installation are:
- Inspect all installation work performed by homeowner.
- Solder copper refrigerant line connections (already mounted in place and connected by homeowner).
- Connect high voltage wiring to main home circuit panel (wiring from circuit panel to condenser may be installed by homeowner).
- Pull vacuum on refrigerant lines with vacuum pump. (Required by law to be handled by an EPA-certified technician.)
- Release refrigerant into system, start-up and balance pressures. (Required by law to be handled by an EPA-certified technician.)
- If you are replacing an existing air conditioning unit, you will also need an air conditioning professional to evacuate the Freon from the old unit before you can remove and dispose of it. It will take a contractor approximately 1 hour to do this, plus perhaps a small refrigerant disposal fee (less than $20).
Building Permits and Inspections
Check with you city’s department of building and safety for specific permit and installation requirements before beginning an installation. Most municipalities require a building permit whether you are replacing the components of an existing AC system or installing a new system. Separate or additional permits may be needed for mechanical as well as electrical work. In general, homeowners are entitled to file building permits themselves as long as the work will be limited to the homeowner’s property. Taking a permit means an inspector will sign off on you work, which protects you and your property.
*Depending on which unit you install, you will need to provide the appropriate gauge wire and breaker / fuse for the main electrical hook up. Cost for these items at a local home store will be approximately $30 – $70, depending on your house. Different air conditioners draw different amperages of current (the larger the unit, the more current), thus heavier gauge wire and breakers / fuses are needed for larger air conditioners. The wiring is run from the condensing unit in the yard to your home’s main electrical circuit panel. This portion of the high voltage wiring may be performed by yourself if done according to code standards, but the final part of connecting the wire into the circuit panel should be performed by your contractor when he comes to start up the air conditioning. Unless you are experienced with electrical work, leave this part of the job to the air conditioning professional since it likely won’t take him much time to do it, and it can be potentially dangerous to do on your own if you’re not familiar with such.


